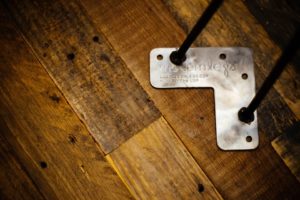
Is attaching hairpin legs really as easy as screwing them into the wood? It can be! Our hairpin legs come with a metal plate with holes in them. This provides an easy way to attach them to the underside of your tabletop while providing maximum stability. We recommend pre-drilling holes before the legs are attached. Aim for holes that are roughly half the diameter of the final screws you will be using. That’s easy enough and now you’ve reduced your chances of the wood cracking when you use the final screws. Voila, you have a table!
If you’re looking for something a bit more challenging or unique, there are lots of options. All you need to do is be sure the metal legs and tabletop are strongly secured to each other. This can be accomplished in a multitude of ways. They can be bolted on leaving bolt tops in your tabletop for added style. We’ve seen tables where folks glued the table to a non-wood surface (in this case stone).
Perhaps you’re thinking about a custom table where there’s a metal support structure underneath your tabletop. Our motto is: ‘if it’s made of metal chances are we can make it’. That means you’re only limited by your imagination. Come up with your table design and run it by us to see if it’s something we can create for you. If this is your first go at a DIY hairpin leg table, maybe simply screwing the hairpin legs to the tabletop is for you. But if you’re looking for some adventure, experiment and see what types of hairpin leg attachment works for you. We’d love to see what great new ways you come up with.


